


 En
EnA Complete Guide to Working with Dropsure
How to Create a Shopify Store
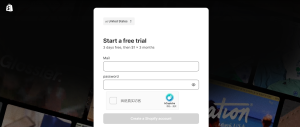
Prepare an Email for Your Shopify Store Login
Before creating your Shopify store, make sure you have an email address ready to use as your login account. This email will be essential for managing your store and receiving important notifications.
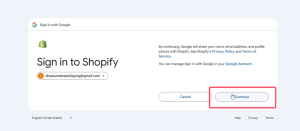
Click “Continue” to Create Your Store
After filling in your details, simply click the “Continue” button. Once done, your Shopify store will be successfully created and ready for setup.
Choose a Basic Plan to Start
You can select the Basic Shopify plan to get started. After that, follow the setup tasks provided by Shopify to customize and configure your store step by step.


How to Connect Shopify Store with DropSure
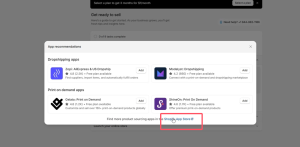
Search for Apps to Enhance Your Store
Browse the Shopify App Store to find useful apps that can help you add new features, improve marketing, and streamline your store operations.
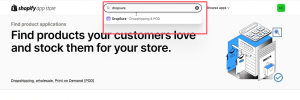
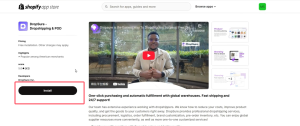
Search for Dropsure and Install It
Go to the Shopify App Store, search for “Dropsure,” and install the app to start integrating dropshipping features with your store.
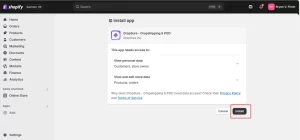
Register Your Dropsure Account After Logging In
Once you’ve installed Dropsure, log in to the app and complete the registration process to set up your dropshipping account.

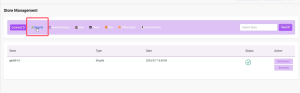
Confirm Your Store Is Successfully Connected to Dropsure
After registration, you’ll see a confirmation that your Shopify store is successfully connected with Dropsure, ready to start importing products and fulfilling orders.
Once you’ve set up your Shopify store and connected it with Dropsure, you’ve taken the first step toward your dropshipping business. Start adding products and running your store—you’ll see results in no time!
How to Properly List a Product to Your Shopify Store
Add the Selected Product to Your Shopify Store
Once you’ve identified a product you want to sell, hover your mouse over the product image. Two buttons will appear in the bottom-right corner of the product card (as shown in the image below).
Click the appropriate icon to begin adding the product to your Shopify store.
 Tip: Make sure to double-check the product details such as pricing, description, and variants before publishing.
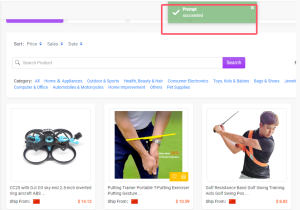
Confirm Successful Product Addition
After you successfully add the product, a system prompt will appear confirming the action — usually displaying a message like “Prompt” (as shown in the image below).
This indicates that the product has been added to your product list and is ready for further editing or publishing.
Set Selling Price and Inventory Before Publishing
Next, click the Store icon again to access the Publishing Page. On this page, you can set the selling price and inventory in bulk, which is especially useful when listing multiple products at once.
Display and Start Selling the Product
After successfully publishing the product, it won’t be visible in your storefront right away — some final settings are still required to make it available for customers to view and purchase.
First, navigate to your Shopify backend, locate the product you just added, and click on the product title to open the product detail page (as shown in the image below).
Enable Sales Channels and Start Selling
On the product detail page, go to the right-hand side panel and click through the available sections. Locate the “Manage Sales Channels” option.
Click it, then select all available channels (such as Online Store, POS, etc.), and click Save.
Once saved, your product will be successfully published to the selected sales channels and become visible to customers.
Branding
Select packaging under the ‘Products’ tab and upload your own logo. Next, go to the ‘Public Catalogue’, select the product you want, and click ‘Branding’ in the ‘Recap’ column. Then, click ‘Select’ to choose the logo you uploaded.
Orders
Connect your store and sync orders
First, you click the “store management” to connect your store, it’s very easy to operate.
Then you can click”Order” tab to check your orders, sync your orders of the store for some days.
Ask for quotation
You can click “Ask for Quote” to get quotation for your orders. Usually it may take about 24 hours. If you are in a hurry, please contact our agents.
Order fulfillment
After we give you quotations, you can pay for your orders. After you pay for your orders, they will be moved to the Processing tab. We will start processing ASAP and meet all your requirements to the factories. This usually may take about 1-3 days, and our processing team will make a careful quality check and double-check with shipping carriers before shipping.
Delivery and Tracking for your orders
Check orders
After you pay, your orders will be moved to “shipped” button, you can check all your fulfilled otders here. For shipping channels, we are cooperating with many big shipping companies in China, like yun, CNE, 4px and so on. We will match the suitable shipping line for your every order.
Track orders
If you want to check the tracking information, please copy the tracking number and track on Dashboard, maximum is 40 orders each time.
After Sales Service and Communication
As for our after sales policy, you can check at the bottom of the website “faqs”.
And you can also contact your personal agent to discuss more details on Dashboard.
Wallet
Recharge Methods
Currently, we use PayPal and bank transfer to top up balance most frequently. And we can provide Bonus for bank transfer. And you can also use air wallex to pay for each order.
Invoice
If you want to download invoice, just click here.
But the default name and address are your account name and email address. If you want to change to your company’s info, just click your avatar, then fill the blanks of Billing, then the exported invoice will be the address you filled here.
Affiliate Plans
With the booming dropshipping business, there is always more than one way to expand your business empire, one of which is joining affiliate marketing. In this tutorial, we will walk you through how Dropsure Affiliate works.
1.Get your affiliate links from your Affiliate Dashboard as shown in the image:
2.Send your friends your affliate link
3.Your customer registers an account through your referral link
4.Whenever your customer places an order, you will receive a 1% commison on every single deal.
Note: if your customer wants to place a big order, you can contact the customer manager directly, and you will discuss a commission different from the fixed rate.
Customize fulfillment settings
Our website also supports personalization. You can check on avatar, and setting tab.
For example: 1: Each country uses different channels
2: Fulfill orders before ot after shipping
3: Your Personalization products will be used for same quantity as the order product or just one product.


